Sunday, 1 February 2009

Introduction

Web 2.0 is a term used to describe the second wave of evolution of the World Wide Web from a static, unidirectional, impersonal medium to a dynamic, bidirectional, highly personalised experience for the web user.

Web 2.0 is all about simplicity, rich interactivity, user participation, collective intelligence and self-service.

"As Web 2.0 reality continues to emerge and develop, our patrons will expect access to everything - digital collections of journals, books, blogs, podcasts, etc." (Away from the Iceberg by Rick Anderson.)

You are encouraged to compete the following exercises to discover some exciting new ways you can use Web 2.0 Internet technologies in your job and your daily life.

The programme is structured over 10 weeks. The goal is to complete on average one stage each week. Some stages will take longer than others.

Remember that we are coming to this challenge with different levels of experience and background knowledge. There is no ”I’m too (something)”, there is no "expert", no “teacher”, no right and wrong answers. Your colleagues are going through these exercises too, so you are not on your own, if you get stuck - ask!

Remember too that you can access this site from anywhere. Some of the exercises will lead you to sites that are blocked by WebMarshall from your workstation so you will need to complete those ones at the Public Internet or Learning Centre computers.

There are 7 1/2 habits of highly successful lifelong learners!
1. Begin with the end in mind.
2. Accept responsibility for your own learning.
3. View problems as challenges.
4. Have confidence in yourself as a competent, effective learner.
5. Create your own learning toolbox.
6. Use technology to your advantage.
7. Teach/mentor others.
7 1/2. Play.

Friday, 30 January 2009

Week 1: Blogging


A blog (short for weblog) is a type of website, with regular entries of commentary, descriptions of events, or other material such as graphics or video. "Blog" can also be used as a verb, meaning to maintain or add content to a blog.

Growth in blogs worldwide is astonishing, with the number of blogs doubling about every 6 months.

You'll discover that blogging is so easy that these publishing tools are being taken advantage of by almost every industry, including libraries.

Because we are using a blog to deliver this training, and as a platform to record your own learning, you'll need to get familiar with how they work.

Step 1. For this and other excercises in this programme, you'll need to create a Google account. Create one here. Note that the email address you use to create this account will be visible in your blog, so you may not want to use your wdc email address.

Step 2. Take a tour and find out how to create your own blog using Blogger. (Take the whole tour before you create your blog.)

Step 3. Create your own blog:
Follow the steps as in the blogger.com tour to create and name your blog, selecting a template, layout, colours, etc. Have a play around with different options to create the look you like.

Once you’ve created your blog there are a few important things to know:

To view your blog:
Your blog address is http://(xxxx).blogspot.com, (xxxx)=the unique name that you gave your blog in Step 2. Be sure to write down your blog address.

Your blog can also be accessed online at http://www.blogspot.com
Write down your google login and password because you'll need these to login to your blog, to make changes or add posts.


Now that you have your blog set up:

1. Add a test post or two. You may like to record the experiences you are having while going through the excercises in this training programme.

2. Send an email to Tissy with a link to your blog so that she can monitor your progress throughout the programme. Let Tissy know if you don't want a link to your blog on this tutorial.

3. Finally, go to Blog Search Engine or use your favourite search engine to find blogs about something you are passionate about, be it travel, horses, extreme sports - whatever...

Have fun!!!!

Thursday, 29 January 2009

Week 2: Photo Sharing with Flikr and Picasa

Flikr is a highly popular photo management and sharing website. Flikr uses keyword “tags” to create associations and connections between photos and users of the site.

NB: Web Marshall will block you from accessing Flickr through the Council network. You will need to do this exercise at the Public Internet or Learning Centre computers.

For this weeks challenge, take a look around the Flickr site to discover what this site has to offer. Find out how tags work there, what groups are, and all the neat things that people and other libraries are using Flikr for.

1. Take the Flickr tour or check out Indezine Tutorials to find out how the site works. Just for fun, take a look at Librarian trading cards.

2. Check out which are the most popular tags used.

3. Create a Free account in Flickr. (As Flickr is part of Yahoo!, you'll need to create a Yahoo! ID.)

4. In Flickr, find an interesting image that you want to blog about or upload one or more of your own photographs to your Flickr account. If you are using your own images, tag at least one of them and mark it public.

5. Have a play with modifying your photo at Picasa This is a free, simplified aternative to expensive photo editing software. (The Public Internet computers have this software already loaded.)

6. Create a post in your own blog which you created in Week 1, about your photo and your experiences of using Flickr and Picasa. Use Flickr's blogging tool to add the modified image into your post or use Blogger's photo upload tool. If you prefer to use an existing Flickr photo, add a link to it.

Photo Posting Etiquette: When posting identifiable photos of other people (especially minors) you need to get the person's permission before posting their photo in a publicly accessible place like Flickr. Don't upload pictures that weren't taken by you (unless you have the photographer's consent) and always give credit to the photographer when you include photos taken by someone else.

Wednesday, 28 January 2009

Week 3: RSS Feeds


RSS stands for Really Simple Syndication or Rich Site Summary.
It is a format for notifying new content at a website.
An RSS document could be called a "Feed" or a "Web Feed."
The icon above is used on websites to indicate an RSS feed.

Do you visit some websites regularly? It takes up valuable time to visit each of your favourite sites and scour them for the information you want. Imagine if you could visit all those information sources and web pages in just one place and all at the same time. Sounds great? You can do this now through a newsreader and RSS.

This week’s challenge is all about RSS feeds and setting up your own free Bloglines account to bring your feeds together.

1. Check out this Bloglines Tutorial to find out how to get started.
The tutorial walks you through how to setup a Bloglines account and add feeds. Follow Steps 1 to 3 to set up your Bloglines account. Steps 4 – 9 are optional and cover how to subscribe to different types of feeds (podcasts, Flickr albums, etc.)

2. Create your Bloglines account. This provides the newsreader software you need.

3. Find some RSS feeds that interest you, lets say 5 work related and 5 non work related ones.
There are several ways you can locate newsfeeds:
When visiting your favorite websites -- look for news feed icons that indicate the website provides it.
Use Blogline's Search tool. Use the Search for Feeds option to locate RSS feeds you might be interested in.
Or use a Search tools like Topix or Syndic8 to find RSS feeds.
Technorati Blog Search can help you find RSS feeds for topic specific blogs you may be interested in.

4. Create a blog post at your own blog about your experience. Don't know what to blog about? Here are some questions to think about ...
Which method of finding feeds did you find easiest to use?
Which Search tool was the easiest for you? Which was more confusing?
What kind of useful feeds did you find in your travels?
What kind of unusual ones did you find?
What other tools or ways did you find to locate newsfeeds?
For an optional extra challenge, add an RSS feed to your blog.

Tuesday, 27 January 2009

Week 4: Social Networking

Social Networking sites create online communities which are particularly popular with teens and young adults. These sites provide opportunities for libraries to connect with users in a virtual environment. This may be a point of contact that libraries otherwise would not have.
Examples of social networking sites are FaceBook and MySpace.

NB: Web Marshall will block you from accessing these sites through the Council network. You will need to do this exercise at the Public Internet or Learning Centre computers.

1. Create your own FaceBook or MySpace presence.

2. Have fun with it by adding any photos, links, cartoons, etc that you feel comfortable adding.

2. Imagine how you could create a Whangarei Libraries web presence on either of these two sites in a way that would appeal and be useful to your customers.

3. Post to your blog your thoughts about the possibilities of our library using sites like these to create a web presence. Don't forget to add a link to your FaceBook or MySpace page in your blog.

Monday, 26 January 2009

Week 5: Revisiting Web 2.0

So far we’ve explored just a small sample of Web 2.0 technologies and websites that are empowering users with the ability to create and share content. It is timely now to revisit what Web 2.0 means and how using web 2.0 technologies can create opportunities for us in our work.

This week's challenge:
1. Read this OCLC newsletter about how libraries can use Web 2.0.

2. Find some websites that use Web 2.0 principles. Amazon is one good example. Do you have any favourite sites that you think fit the definition of Web 2.0?

3. Select any three sites from the Web 2.0. Awards nominees It would be a good idea to first select a category that interests you and then select a site to explore.

4. Create a post on your blog about your discoveries. What did you like or dislike about the NZ and Web 2.0 nominee sites? What were the sites' useful features? Could you see any applications for their use in a library setting? Remember to insert links in your blog to the sites you are discussing.

Sunday, 25 January 2009

Week 6: Tagging and Folksonomies


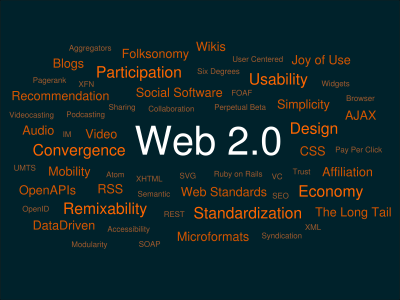
Tagging is an open and informal method of categorizing that allows users to associate keywords with online content (webpages, pictures & posts). Unlike library subject cataloging, which follows a strict set of guidelines (e.g. subject headings), tagging is completely unstructured and freeform, allowing users to create connections between data any way they want. The picture represents a tag cloud, or a way of pictorially showing which terms are the most used - i.e., the larger the word is, the more commonly it is used as a tag.

Wikipedia describes tagging as "a non-hierarchical keyword or term assigned to a piece of information (such as an internet bookmark, digital image, or computer file). This kind of metadata helps describe an item and allows it to be found again by browsing or searching. Tags are chosen informally and personally by the item's creator or by its viewer, depending on the system. On a website in which many users tag many items, this collection of tags becomes a folksonomy."

Folksonomy (also known as collaborative tagging, social classification, social indexing, and social tagging) is described by Wikipedia as "the practice and method of collaboratively creating and managing tags to annotate and categorize content. Folksonomy describes the bottom-up classification systems that emerge from social tagging. In contrast to traditional subject indexing, metadata is generated not only by experts but also by creators and consumers of the content. Usually, freely chosen keywords are used instead of a controlled vocabulary. Folksonomy (from folk + taxonomy) is a user-generated taxonomy."

Tagging and folksonomies are important features of many Web 2.0 services.

Technorati, as we have already discovered, is a leading search tool and authority for blogs. So how can you tag your posts with keywords to make them more findable through a Technorati search? All you need to do is add a little bit of HTML code to the bottom of your post and Technorati will pick up these tags when it spiders (or web crawls) your site.

In Technorati you can search for keywords in blog posts, search for entire blog posts that have been tagged with a certain keyword, or search for blogs that have been registered and tagged as whole blogs about a certain subject (like photography or libraries).

Flikr also uses tagging as a way of allowing contributors to categorise their photographs.

This week's challenge:

1. Find out how to tag a photograph on Flikr, then tag the photograph that you uploaded there with your own keywords.

2. Tag your blog with your own keywords.

3. Go to Technorati and try doing a keyword search for “Learning 2.0” in Blog posts, in tags and in the Blog Directory. Are the results different?

4. Create a blog post about your discoveries on your blog.

OPTIONAL: If you're up for a challenge, learn how to tag your posts with Technorati tags so they can join tag searches. Create a post about something. It can be anything you want and add the HTML code to the bottom to tag it. Find out how at Technorati FAQs
NOTE: When adding HTML code, you'll want to make sure you're in Blogger's Edit HTML window.